Snowflake
Setting up the Snowflake destination connector involves setting up Snowflake entities (warehouse, database, schema, user, and role) in the Snowflake console, setting up the data loading method (internal stage, AWS S3 bucket).
This page describes the step-by-step process of setting up the Snowflake destination connector.
Prerequisites
- A Snowflake account with the ACCOUNTADMIN role
- (For Key-Pair Auth) 2048-bit RSA key pair (recommended for service users)
- Network access configured if using IP restrictions
Network policies
By default, Snowflake allows users to connect to the service from any computer or device IP address. A security administrator (i.e. users with the SECURITYADMIN role) or higher can create a network policy to allow or deny access to a single IP address or a list of addresses.
To determine whether a network policy is set on your account or for a specific user, execute the SHOW PARAMETERS command.
Account
SHOW PARAMETERS LIKE 'network_policy' IN ACCOUNT;
User
SHOW PARAMETERS LIKE 'network_policy' IN USER <username>;
To read more please check official Snowflake documentation
Authentication Method Selection
Choose an authentication method:
Method 1: Username & Key Pair Authentication (Recommended)
Why recommended: Snowflake will soon deprecate password authentication for service accounts
Requirements:
- Private key in PEM format (encrypted or unencrypted)
- Corresponding public key registered in Snowflake
- (If encrypted) Passphrase used for private key encryption
Method 2: Username & Password Authentication
Requirements:
- Snowflake username/password with required privileges
Setup Instructions
Step 1: Generate Key Pair (Key-Pair Auth Only)
You can use various algorithms to generate your keys. The following commands are suggestions only.
Generate private key (unencrypted): On a terminal, run:
openssl genrsa 2048 | openssl pkcs8 -topk8 -inform PEM -out rsa_key.p8 -nocrypt
Generate private key (encrypted): On a terminal, run:
openssl genrsa 2048 | openssl pkcs8 -topk8 -v2 des3 -inform PEM -out rsa_key.p8
Generate public key from private key: On a terminal, run:
openssl rsa -in rsa_key.p8 -pubout -out rsa_key.pub
Step 2: Set up Matia-specific entities in Snowflake
To set up the Snowflake destination connector, you first need to create Matia-specific Snowflake entities (a warehouse, database, schema, user, and role) with the OWNERSHIP permission to write data into Snowflake, track costs pertaining to Matia, and control permissions at a granular level.
-
Edit the following script to change the password to a more secure password and to change the names of other resources if you so desire.
Note: Make sure you follow the Snowflake identifier requirements while renaming the resources.
    --
    -- Snowflake Destination Setup Script
    --
    begin;

    -- Create variables for:
    -- User / password / role / warehouse / database (use UPPERCASE)
    set role_name = 'MATIA_ETL_ROLE';
    set user_name = 'MATIA_ETL_USER';
    -- Remove this line if you're using key-pair authentication
    set user_password = '{PLEASE SET A PASSWORD}';
    set warehouse_name = 'MATIA_ETL_WAREHOUSE';
    set database_name = '{Provide the database to store the output data}';

    -- Change role to securityadmin for user / role steps
    use role securityadmin;

    -- Create role for Matia
    create role if not exists identifier($role_name);
    grant role identifier($role_name) to role SYSADMIN;

    -- Create a user for Matia -
    -- NOTE! Depending on the authentication method remove one of the following 2 commands

    -- -- For key-pair authentication use the following command
    create user if not exists identifier($user_name)
    rsa_public_key = <PUBLIC_KEY> -- e.g randomandomKeyExample89012345keyDATA6789exampleKEYabcdanotherLineOfKeyDataToSimulateTheFormatAndLengthUsedInRealKeys=
    default_role = $role_name
    default_warehouse = $warehouse_name;

    -- -- For password authentication use the following command
    create user if not exists identifier($user_name)
    TYPE = LEGACY_SERVICE
    password = $user_password
    default_role = $role_name
    default_warehouse = $warehouse_name;

    grant role identifier($role_name) to user identifier($user_name);

    -- Set binary_input_format to BASE64
    ALTER USER identifier($user_name) SET BINARY_INPUT_FORMAT = 'BASE64';

    -- Change role to sysadmin for warehouse / database steps
    use role sysadmin;

    -- Create a warehouse for Matia
    create warehouse if not exists identifier($warehouse_name)
    warehouse_size = xsmall
    warehouse_type = standard
    auto_suspend = 60
    auto_resume = true
    initially_suspended = true
    MIN_CLUSTER_COUNT = 1 -- recommended, remove if not on enterprise
    MAX_CLUSTER_COUNT = 4 -- recommended, remove if not on enterprise
    COMMENT = 'Matia ETL warehouse';

    -- Create database for Matia
    create database if not exists identifier($database_name);

    -- Grant Matia role access to warehouse
    grant USAGE
    on warehouse identifier($warehouse_name)
            to role identifier($role_name);

    -- Grant Matia access to database
    grant CREATE SCHEMA, MONITOR, USAGE
    on database identifier($database_name)
            to role identifier($role_name);

    -- Change role to ACCOUNTADMIN for STORAGE INTEGRATION support (only needed for Snowflake on GCP)
    use role ACCOUNTADMIN;
    grant CREATE INTEGRATION on account to role identifier($role_name);
    use role sysadmin;

    commit;
- Run the script using the Worksheet page or Snowsight.
Step 3: Configure Matia Connection
In Matia UI:
-
Account: Fill out the Account locator information in the form of
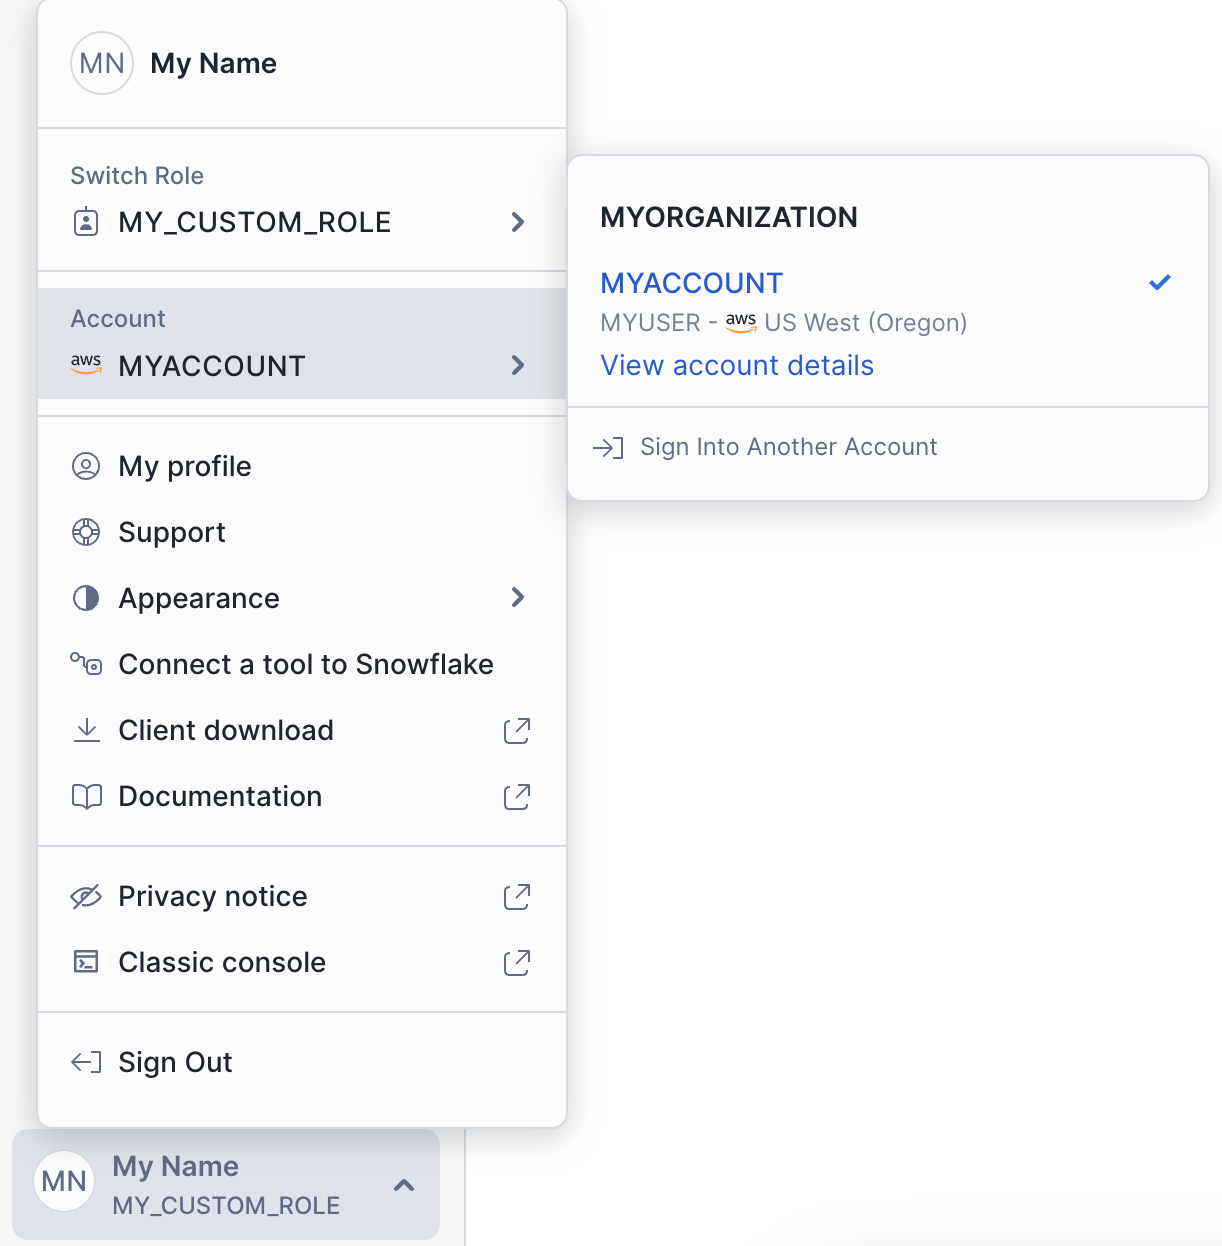
organization_id-account_id.How to find your Organization ID and Account ID:
- Open Snowsight UI.
- Click your username in the bottom-left corner.
- Go to Account.
- Click "View account details" — you'll see both the Organization ID and Account ID.
See the Snowflake Account Identifier documentation for full details.
-
Username: The username you created in Step 2 to allow Matia to access the database. Example: MATIA_USER
-
Key Pair / Password
Key-Pair Auth:
- Private Key (contents of rsa_key.p8). Ensure it is in PEM format
-----BEGIN ENCRYPTED PRIVATE KEY-----
...
-----END ENCRYPTED PRIVATE KEY----- - Passphrase (if using encrypted key)
Password Auth:
- Password: The password you created in Step 2 to allow Matia to access the database.
- Private Key (contents of rsa_key.p8). Ensure it is in PEM format
-
Warehouse: The warehouse you created in Step 1 for Matia to sync data into. Example:
MATIA_WAREHOUSE -
Database: The database you created in Step 1 for Matia to sync data into. Example:
MATIA_DATABASE -
Name: Enter a Name for the connector.
-
Description (Optional): Enter a Description for the connector.
-
Owner: Select the Owner of the connector.
-
Test Connection: Verify that your Snowflake account is successfully connected by clicking on Test Connection.
Matia system properties output schema
Matia outputs each stream into its own table with the following columns in Snowflake:
| Matia field | Description | Column type |
|---|---|---|
| _matia_id | A UUID assigned to each processed event that has no unique ID | VARCHAR |
| _matia_synced | A timestamp for when the event was pulled from the data source | TIMESTAMP WITH TIME ZONE |
| _matia_deleted | A boolean to indicate deleted fields. | BOOLEAN |
Supported sync modes
The Snowflake destination supports the following sync modes:
- Full Refresh
- Incremental